In the world of print design, achieving high-quality results is essential for businesses looking to make a lasting impression. Whether you’re creating marketing materials, designing a logo, or printing photographs, resolution and clarity play a vital role in the overall visual impact of your prints. Understanding the importance of resolution, the concept of dots per inch (DPI), and implementing best practices will ensure that your prints are crisp, clear, and visually appealing.
Understanding Resolution and DPI
Resolution, often referred to as dots per inch (DPI), is a measurement of how many dots or pixels fit into one inch. The higher the resolution, the sharper and more detailed the image will appear in print. When it comes to printing images, it is recommended to have a resolution of at least 300 DPI for optimal results.
The Relationship Between Resolution and Image Quality
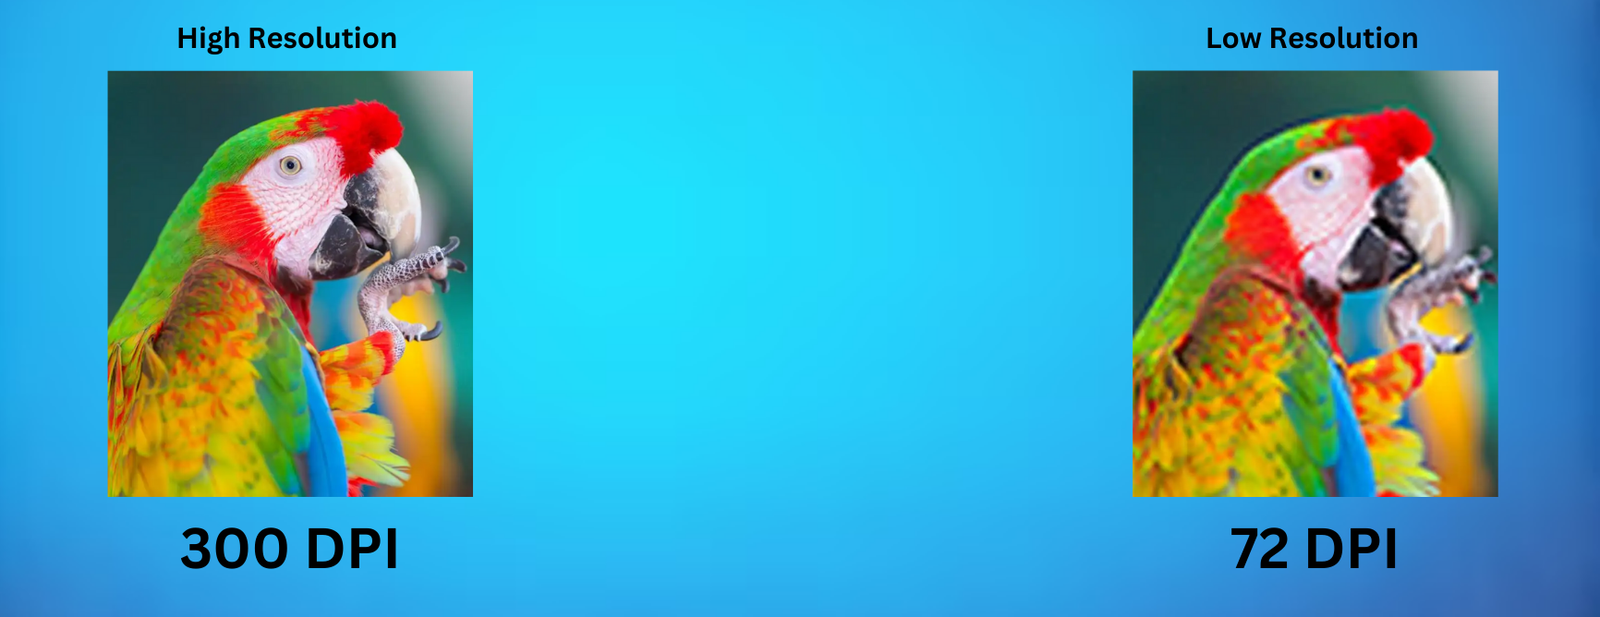
The resolution of an image directly affects its quality when printed. Higher resolution images appear sharp and detailed, while lower resolution images can appear fuzzy, jagged, and blurry. To illustrate this, let’s consider two images: one with a resolution of 300 DPI and another with a resolution of 72 DPI. The 300 DPI image will maintain its quality even when zoomed in, while the 72 DPI image will appear pixelated and blurry.
It’s important to note that resolution and image size are inversely proportional. Enlarging an image decreases its resolution, while reducing an image increases its resolution. However, it is crucial to maintain a balance between image size and resolution to ensure high-quality prints.
Best Practices for Image Resolution
To ensure your images are suitable for printing, here are some best practices to follow:
- Minimum Resolution: Images should have a minimum resolution of 300 DPI at the final size in the layout. For images that include text, a resolution of 400 DPI is recommended.
- Original Capture Settings: The settings used during the original capture of an image, such as scanning or using a digital camera, determine its base resolution. Higher quality settings during capture result in better resolution. Save your images as lossless TIF or EPS files to preserve color and sharpness.
- Avoid Low-Resolution Web Images: Web images are typically low resolution, ranging from 72-96 DPI, and are not suitable for high-quality printing. Avoid saving images or graphics from websites for print projects.
- Avoid Upsampling: Upsampling refers to increasing the resolution of a low-resolution image without changing its dimensions. This process often leads to blurry and pixelated images. To improve resolution, decrease the image size or recapture the image at a higher quality setting.
Determining the Right Size and DPI for Printing
When preparing your images for printing, it’s essential to determine the appropriate size and DPI based on your desired output. Consider the viewing distance and the printing method to ensure optimal clarity.
Viewing Distance and DPI
The viewing distance plays a significant role in determining the required resolution for printing. The following chart provides a guideline for choosing the minimum resolution based on the viewing distance:

To determine the optimal image size and DPI for your print project, follow these steps:
- Start with the final size of your print in inches.
- Multiply the desired DPI by the dimensions in inches to calculate the required number of pixels. For example, for an 8×8″ print at 300 DPI, you would need an image size of 2400×2400 pixels.
- Use a pixels-to-inches conversion chart or an online calculator to determine the appropriate image dimensions for your desired print size and DPI.
Remember to take cropping into account if you’re using only a portion of an image. Adjust the image size accordingly to ensure optimal resolution and clarity.
Sharpening Your Images for Print
In addition to resolution and DPI, applying sharpening to your images can enhance their clarity when printed. Prints require more sharpening than computer monitors, so it’s essential to apply the right amount.
When applying sharpening, zoom the photo to 100% to accurately gauge the effect. Look for areas with fine detail, such as eyes, when adjusting the sharpening amount. Applying a little extra sharpening can compensate for any loss of sharpness during the printing process.
Saving Images for Print: File Formats and DPI
Choosing the right file format and maintaining the appropriate DPI are crucial when saving images for print. Here are some important considerations:
- Lossless File Formats: Save your images in lossless file formats such as TIF or EPS. These formats preserve color, contrast, and file size without compromising image quality. They are ideal for editing and ensuring the integrity of your images.
- JPEG/JPG Limitations: JPEG or JPG files are lossy file formats that prioritize file size over image quality. Each time a JPEG file is saved, it loses some image data, resulting in a decrease in quality. If you’re working with a JPEG file and need to make edits, save it as a lossless format (TIF or EPS) before making any changes.
- PNG for Web and Print: PNG files are a good option for web and print as they maintain the pixel integrity of your image and support transparency. However, keep in mind that PNG files can be larger in size compared to JPEG files.
- Checking DPI Before Printing: Before sending your file to the printer, double-check the DPI of your image. Ensure the DPI matches your desired printing resolution (e.g., 300 DPI).
Conclusion
Achieving high-quality prints requires careful consideration of resolution, DPI, and image settings. By understanding the importance of resolution, choosing the right DPI, and following best practices for saving and sharpening images, you can ensure your designs are crisp, clear, and visually appealing. Remember to always use lossless file formats, maintain an appropriate DPI, and consider the viewing distance when determining the required resolution. With these guidelines in mind, you can confidently create stunning designs that showcase the beauty and detail of your images.
For professional logo design services in Hyderabad, look no further than Pixel Fusion. As the best graphic design agency in Hyderabad, we specialize in creating professional and creative logo designs. Our team of experts combines pixels and precision to deliver exceptional results. Contact us today for all your logo design and branding needs and experience the Pixel Fusion difference.
Remember, when it comes to print design, resolution and clarity are key. Trust Pixel Fusion to bring your vision to life with precision and creativity.